Capturing expenses the moment you spend
No matter how hard you try to stay on top of everything throughout the day, it can be pretty challenging to hold onto your receipts and to keep your expenses organized. There’s always inevitably a receipt or ten waiting to be sorted through.
To help make sure you’re streamlining your day-to-day, let’s take a look at how to capture and organize expenses on the spot with the Invoice2go, a Bill.com company, expenses feature, so you don’t get stuck with extra work at the end of the day.
Capturing expenses from anywhere
The best time to record your expense is the moment you’re handed a receipt. It’s tempting to just get on with your day and ‘deal with it later’ but learning how to be productive as you go is a real efficiency booster.
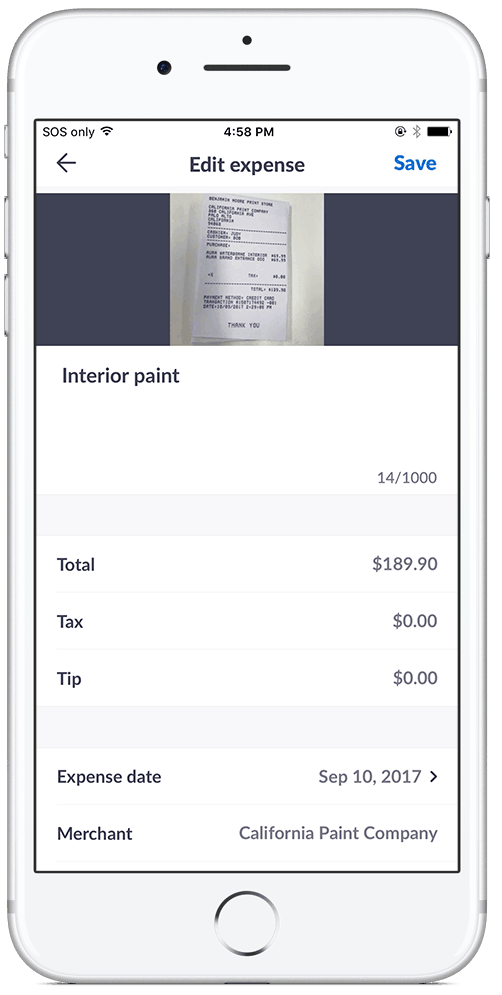
You’ll find the Expenses feature in the side navigation menu within your Invoice2go app. Tap Create expense to get started. Add a description (e.g. paint) and then add photo proof by snapping or uploading a photo of your receipt. From here you can record the total and any taxes or tips. You can change the date, add the merchant name and add categories for routine expenses, e.g. meals, office supplies, construction materials, etc. Hit save and you’re done.
Adding an expense to your invoice
Once you get into the routine of capturing expenses on the go, what’s next? Adding expenses directly to your invoices can go a long way to establish trust with your customers. Most people appreciate an invoice that’s itemized and clear. When you include visual proof of expenditures, there is no question about where their money is going.
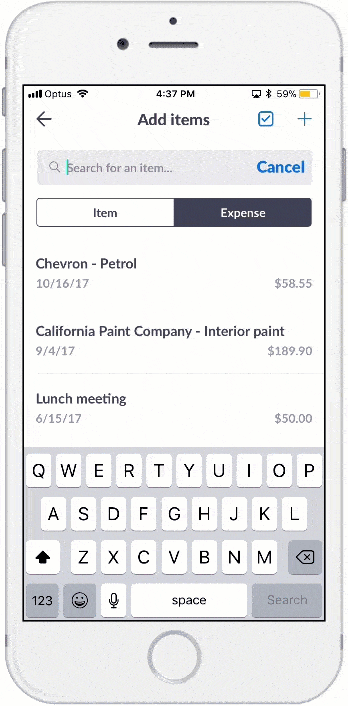
To add an expense to your invoice, tap Invoices and select the invoice you want to modify. Select Edit and Add items. Tap the Expense tab, and add the desired markup if there is one. Hit save.
On the invoice, you’ll see expenses listed under Items. When you email the invoice to your client, the images will appear below the invoice. This gives your clients a visual confirmation of the cost of these items.
Exporting expenses at tax time
Keeping your expenses organized throughout the year also means you’ll be automatically prepared when tax time rolls around. It’s really straightforward to export the details for yourself, or get them ready to send off to your accountant.
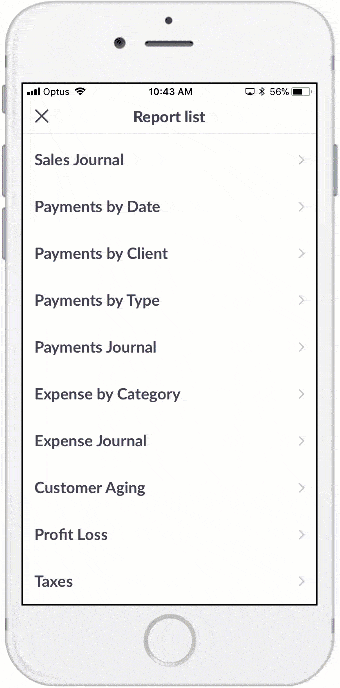
Open Reports from the side navigation menu, selects Report list, tap Expense journal and then export. The report will be sent to your email. Download it, then send to your accountant via email or however you’d like.
If you’re not doing it already, create a habit where you capture expenses the moment you spend. You’ll save yourself time at the end of every day, and have peace of mind knowing you’re staying organized as you go.
For more information, how-to articles and FAQs about Expenses or any other Invoice2go feature, visit our help center.
Related Articles

How to accept credit card payments on Invoice2go in 3 simple steps
Accept payments online via Apple Pay and Google Pay

Must-not-miss write-offs as you wrap up 2022 year-end finances

5 ways accepting credit and debit card payments helps your business stay resilient

4 easy ways to increase cash flow today

What is Small Business Saturday and why is it important?

The features and surprising benefits of a well-designed packing slip